Sunday, January 29, 2012

Straps

In the meantime, this chest is a little bit of a lightweight and may not be durable without iron straps. My research shows that strapping was common, and while it was less common on hutch chests than other kinds it was far from unheard of. In this case, the sides will be the weakest and so the straps will mostly reinforce the corners of the chest. The strap hinges will also be made in the same pattern. Don used the pattern I designed to program the plasma cutter for a bunch of cutouts, and at the present time I am busy filing their contours and correcting the machine's mistakes.


Fitting the joints

When the mortises were carved, it was time to make whatever cuts I needed to make to the tongues on the centerpieces so they could all fit. Trimming the walls of the mortises is out of the question, and it's always better to trim up the tenon instead. A combination of chisels, rabbet plane, and finger planes were needed to trim down those pesky tenons so that they'd fit. I spent a very long time in trial and error before I got each set to fit. As you can see, the thin boards have warped significantly due to moisture, which was a complication. One side looks much nicer than the other, so I think I know which one is going to be the front. As a side note, in all of my pictures it may look as if Don is doing all the work, but this is just because I have so many opportunities to photograph him while he's showing me how to do something, while I never manage to get any pictures of myself while my hands are busy. In truth, I think Don is increasingly content to let me do my own thing once I know the ropes. I feel more and more comfortable working unsupervised.

For now, the joints are a little flimsy and we're waiting for the glue to dry.


Joinery 101

The front part and the corresponding back part of a hutch chest are each made of two stiles which serve as legs that are joined to either side of a shorter centerpiece. Our goal here is a pegged tongue-and-groove joint, which is in a way also going to be a kind of lap joint or mortise and tendon joint. If what I just wrote doesn't make any sense and horribly butchered those terms, it's because I'm a joinery novice and I'm still not exactly sure how the nomenclature applies to a joint that serves multiple functions like this. Anyway, this is how we proceeded. Don showed me how a mortise is delineated with a mortising pin by calibrating the distance of the teeth and then drawing scratches across the edge. Both the mortise and the tenon in this case will stop before the point where the bottom and top of the boards are located, so that the completed joint won't shift up and down.


Don showed me how a mortise such as this is chiseled the old fashioned way. It is important to make shallow stop cuts with the chisel so that the wood grain does not cause the wood to shear off in an uncontrolled manner, and to remove small chips and shavings bit by bit. The passage about chiseling a mortise in the short story I wrote for this independent study, called "The Masterpiece", is inspired by my own experience of trial and error with Don.


Eventually I was chiseling entirely on my own, and in the meantime Don carved the mortises in the other stiles the modern way using a machine tool. The point was for me to learn how it was done in the old days, but in the interest of time we also had to speed things up. Once my mortise was finished, I had to cut the tenons of the centerpieces on each end so as to fit better into the mortises. The rectangular mortise is the one that I hand-chiseled, while the one with rounded ends is one of those that Don put through the machine.


Wood Preparation

Donald and I visited a reputable dealer:
And we got ourselves twenty feet of this:
It's plain-sawn American Red Oak, and in this state it was pretty rough. It needed to be squared up, finished, and reduced to a manageable weight. First we put it all through several passes in the planer, which leveled the surface (mostly) and reduced the thickness. On the left of the bottom photo is after they went through the planer, and on the right is how thick it was before that.

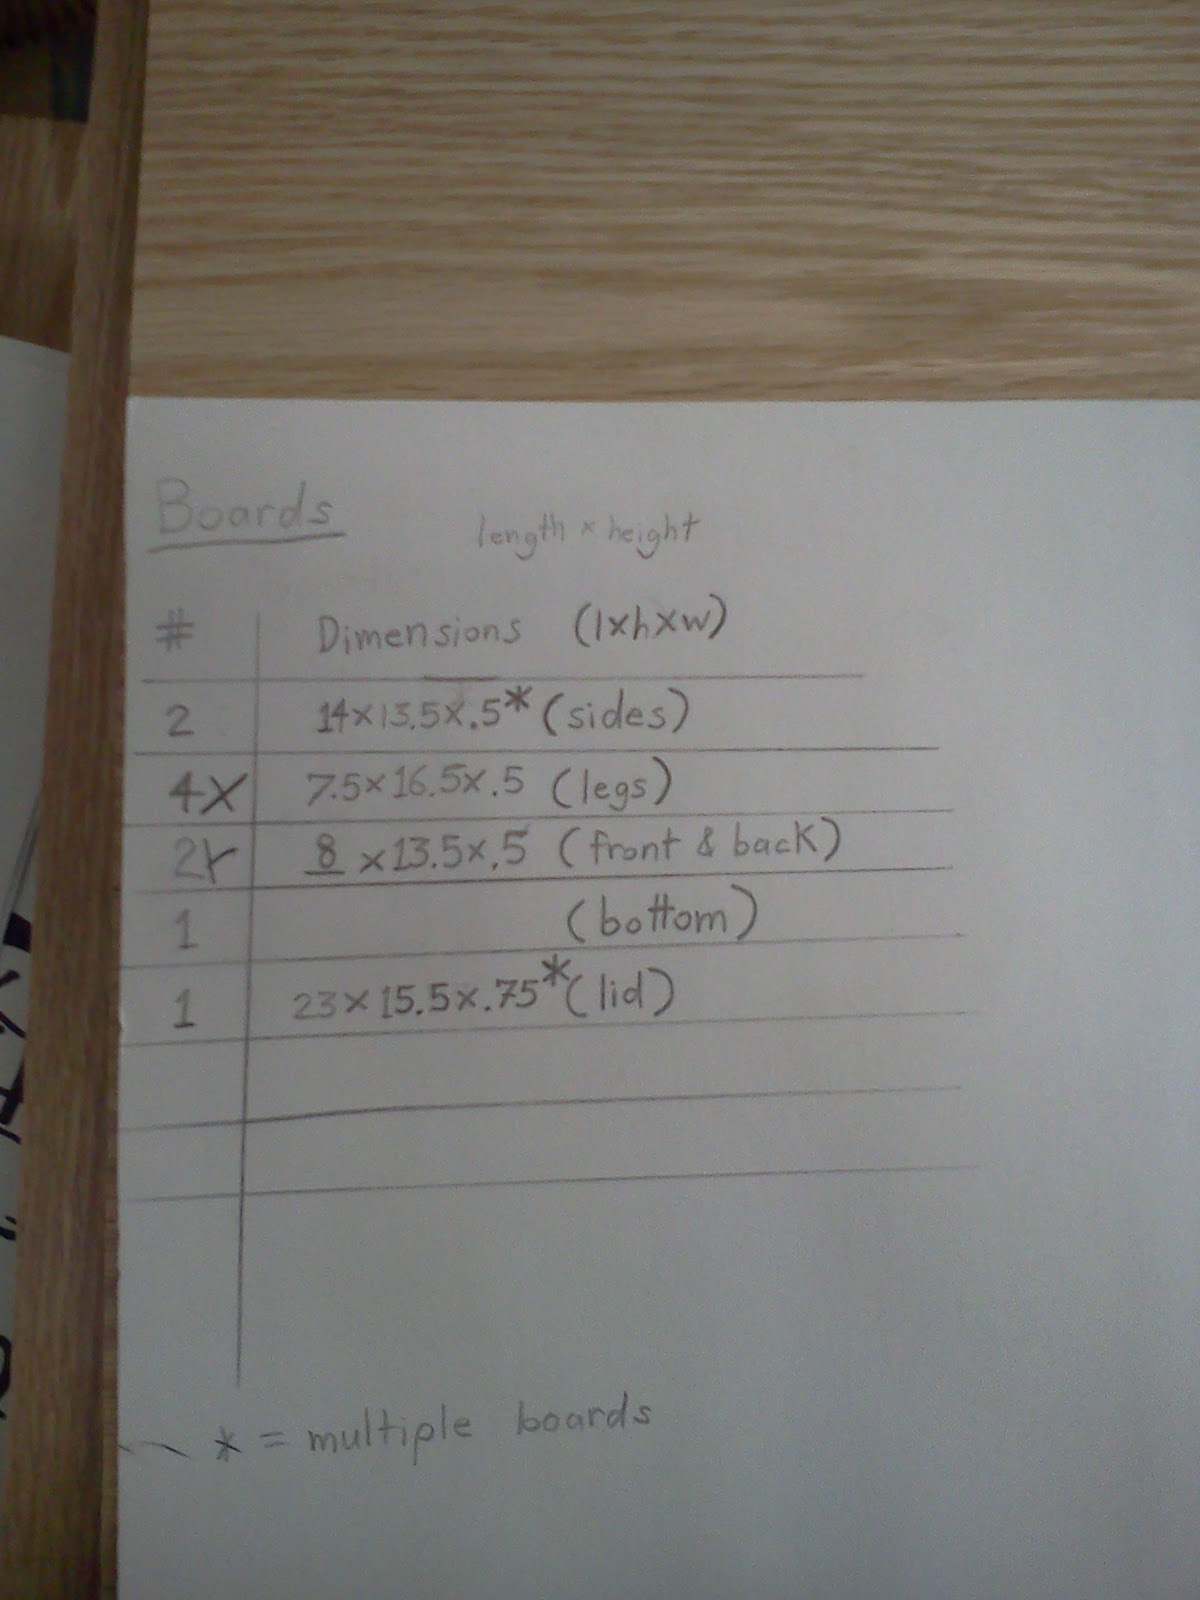
Don straightened up the edges with the jointer and then we used the circular saw cut most of the pieces down to the size we needed, as specified in my cut-list.


None of the boards was wide enough to make a side board or the lid, so we had to glue together pairs of boards like so:


After that I was on my own for a while. When these boards were dry enough I spent a long time scraping off the dried glue at the seams.
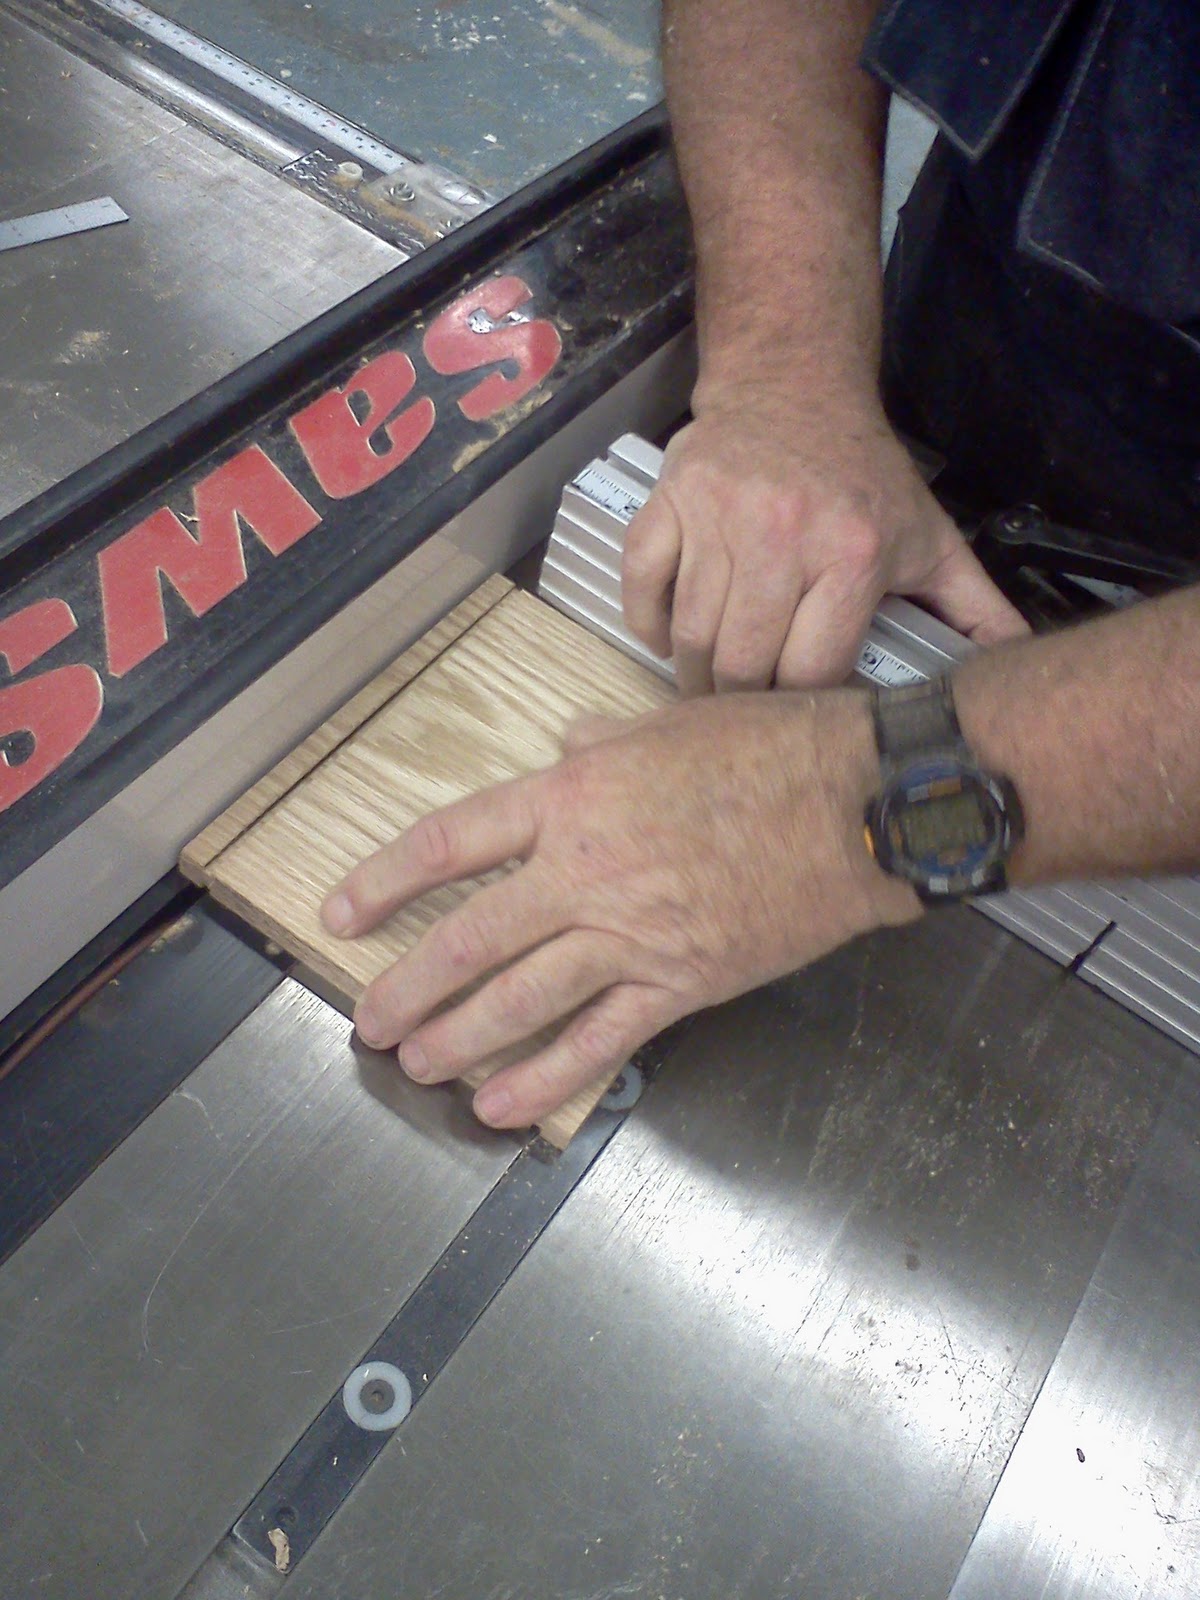
Now nobody's the wiser that these aren't solid boards. Another thing we did that day was use a table saw to cut tongues for the centerpieces of the front and back.

There was a nice pile of usable parts by the end of it.

The Medieval Chest

Hello again dear readers, today I will quickly review how I began the chest project. During the Early and High Middle Ages, before many of the types of furniture we're now familiar with came into being, a chest was one of the most important pieces of furniture and storage that existed in the household. They were storage containers for possessions, often fitted with locks in order to keep valuables safe, and chests meant to sit in the home often had design features that made them useful in other ways. Large furniture chests with flat lids could serve as chairs or table surfaces in a pinch, and chests that sat on the floor usually had legs that raised them to a more convenient height and kept them from getting dirty. In contrast, travelling chests often had gabled or barrel-shaped lids for sturdiness and to shrug off rain or snow if they were transported in inclement weather. Because legs could break off during rough handling many traveling chests did not have them. People had all kinds of things that had to be stored away. A carpenters' sturdy tool chest would contain the artist's specialized wood tools, while noble families kept their luxurious clothes in fine coffers under lock and key. They would be plain or decorated with ironwork or carvings depending on the owner's budget and whether or not the piece was going to be displayed, and there were many different ways of putting a chest together.

This website summarizes some construction methods that evolved:
http://www.greydragon.org/library/chests.html

I found a reference photograph that I wanted to base my blueprints upon, and later found an example of iron strapping to loosely imitate. In terms of construction style I'm making a "hutch" style chest.


Here is the plan that I drew up, with a list of what I would need to cut:


Donald and I went to a lumber yard and I bought about 20 feet of plain-sawn red oak. Red oak is an American species of tree and its properties and appearance are different from the kind of European white oak that some medieval chests were made of. All the same, its a good substitute and a nice wood.

Thursday, January 19, 2012

Finished product/What is a buckler?

I have finished the buckler that I've been making for three months, and I am very satisfied.It is meant to be a reasonable facsimile of 14th century European examples. It's not accurately constructed in every way, and there's some small problems. One is that it's made of thin gauge steel. Next time I make one I'll use thicker sheet metal, which will be more difficult to shape but much stronger against sword blows. Cosmetically it shows obvious hammer dings that I can't get off, it's a little asymmetrical, and the wrap is kind of haphazard. These flaws are mostly because it's my first time making one, and I hope you'll agree that it's not too shabby. It took a lot of work. Here it is in my hands.


Donald and I have made this as faithfully to the historical design and construction as possible while still using some modern tools to speed things up, and how we made it is mostly what this blog is about. Soon I will discuss the next project, a medieval chest. However, here may be a good place to lay out the context in which the buckler existed. 

A buckler is a kind of small shield for foot combat that was popular in Medieval and Renaissance Europe. The English-language name for this small shield might come from French word boucle meaning a shield boss, and buckers may have evolved out of the large wooden shields used in the Viking era which had a big round central boss and a center grip. The benefit of a small shield such as a buckler over a large one is its portability and the handy, nimble way it can be used. During the hundreds of years when it was in use, various styles of fighting with a combination of sword and buckler were developed. The discovery of some surviving sword-fighting instruction manuals such as Royal Armouries Manuscript I.33 (pronounced "one-thirty-three") has helped to disprove the stereotype that medieval sword-fighting was crude or unsophisticated, and revealed that it was actually an elegant and effective martial art. The I.33 manuscript was written in the late 13th century and exclusively shows fighting with swords and bucklers. The manuals of later fencing teachers such as Hans Talhoffer (15th century) and George Silver (16th century) show how new styles of sword-and-buckler fighting evolved in different time periods, how different kinds and shapes of bucklers were invented to suit people's preferences, and what a great diversity of martial arts styles existed across the European continent. Here are some pictures of me in poses with my buckler, which are wards taught by the I.33 manuscript. The sword depicted is the "Practical Norman Sword", a production model stage sword by CAS Iberia/Hanwei.


Here is an example of sword-and-buckler fighting from a 15th century fight manual of Hans Talhoffer's system. It depicts a technique in which the swordsman on the right blocks a cut from above (oberhau) with both sword and buckler in a way that sets him up to grapple his opponent's sword arm. He traps his opponent's sword arm using his buckler arm and thrusts his own sword into his opponent. Attack and defense were seen as two sides of the same coin, requiring the sword and buckler to be used in unison, and proper posture, footwork and timing were essential. Gentlemen underwent years of hard, tedious practice under their fencing masters in order to become proficient fighters. The relatively small size of the buckler is necessary grappling to be effective. 


The buckler was considered to versatile and practical companion for battlefield and self-defense situations. Although it was not wide enough to provide much cover from missiles, it was a good swordsman's companion in a street fight or a tight press on the battlefield. Bucklers were portable, and some of them had hooks to be hung from a belt. This made sword and buckler an option for civilian self-defense, but it was also a favorite of archers and crossbowmen.

This is just a quick overview meant to cover as much of the subject as possible. My next project, which I will document soon, is a medieval-style oak wood chest. Thank you all for tuning in.

wrapped, riveted, and ready to go.

At last! As I write this the whole buckler is finished already, but this installment will summarize how I made and stuck on the handle. This condenses maybe two seperate days of work into one go. These photos recap how after several trials and errors of forging I made a strip of metal that I liked, and then belt-sanded it until it was smooth and shiny. With Don's help I drilled holes and cut rivets.


Next I made a wooden core using a round dowel of wood which was conveniently available. There's reason to believe it's birch wood. I used files and the belt sander to get it in an ergonomic shape. Next I glued up the groove in the wood and fitted it onto the steel.

Next it was time to give it a leather wrap, for traction and aesthetics. I was caught off guard because I had no leather to use, but it came to pass that Don discovered some pig-skin leather. At first I thought it was a silly idea to use pink-colored leather, but Don pointed out it was the only material we had and that I couldn't be too picky. I had to admit that it's material properties were perfect, so after a little tutorial by Don I wrapped it round the handle. We used regular wood glue, stretching the skin and doing a little at a time. When it was done I trimmed and folded the ends, using wire to secure it. I ended up keeping the wire on the handle as a bit of decoration. 


The time for riveting was upon us. We set up a 'thingy' in the vise with a groove in which the head of each rivet would sit. After we had cut the rivets to the right shortness, we peened the other end of each rivet until each was nice and snug. After that I had a finished buckler, so I gave the dish a big more sanding and a nice coat of spindle oil to preserve it against rust. Unfortunately I made an ill-advised attempt to brush the underside with the wire brush of the bench grinder, so a bit of pigskin on one side of the handle got scratched. No big problem, just a shame.